ARKANSAS — Want to make delicious camp meals your friends and family will rave about? Learn to cook stews, baked beans, biscuits, cobblers, cakes and other favorites in a Dutch oven. For centuries, cooks have used this versatile cooking utensil to prepare delectable meals for hungry campers.
Dutch ovens as we know them today were developed in the early 18th century. They were sometimes called “bake kettles” or “bake ovens,” but “Dutch oven” (a name of uncertain origins) became the title of choice long ago. By the mid-1700s, nearly all American families were cooking in Dutch ovens on home hearths and campfires.
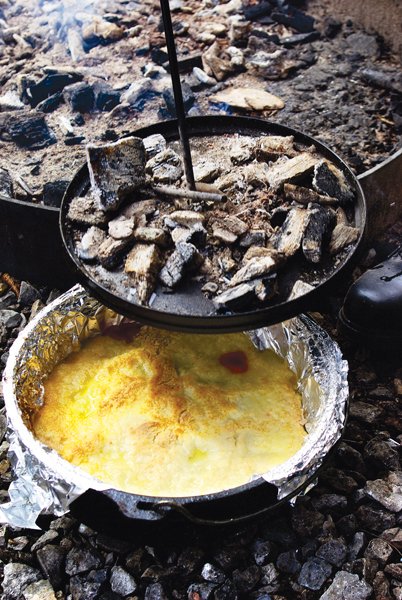
The Dutch ovens used by today’s camp cooks differ little from early models. Each is a large deep pot with a tightly fitting lid. Three short legs support the whole affair over coals on the ground. The lid has a raised rim to retain coals placed on the lid and to keep ashes from falling into the oven when the lid is lifted. With this arrangement — coals on top and coals beneath — the oven can be evenly heated for better cooking.
A fixed handle on top of the lid provides for lifting the lid. A bail of steel wire is permanently attached to the pot portion for lifting and moving the whole oven. Old-time ovens were heavy cast iron, as are many modern versions, but now you can get lighter aluminum ones, too. I prefer cast-iron ovens, however. Cast iron heats slowly and evenly, and retains the heat long after the pot leaves the fire. In aluminum ovens, which do not have these characteristics, food often burns and sticks.
Seasoning a cast-iron Dutch oven is very important. This is done by first cleaning the oven in hot sudsy water to remove any factory coating on the metal. Then rub salt-free shortening or cooking oil on all surfaces of the oven, and place in an oven preheated to 250 degrees for two to three hours. After heating, remove the oven, allow it to cool and cover the whole metal surface with a light coating of cooking oil to protect the metal from rusting. Your oven will form a black patina, or finish, with continued use.
Aluminum ovens won’t rust and don’t need any preparation before or after use. Simply wash and dry; no need to oil.
Preheat the Dutch oven before baking food. Do this by placing a few coals on top and a few underneath for several minutes. This helps keep food from sticking in the oven.
Food can be placed directly in the oven, or placed in a pan or aluminum foil wrapper in the oven. I like to cook large cuts of meat, soups and stews, and boiled or steamed vegetables directly in the oven. Foil cups are good containers for muffins and breads. When making a cake or pie that needs to be removed for cutting and serving, I use a pan in the oven, elevated above the bottom to allow heated air to circulate all around and protect the dish from overheating by the coals beneath. A couple of metal tent pins or nails, or a few pebbles, placed in the bottom of the oven support the pan.
Coals are placed under the oven, and on top, when cooking. Generally, when making dishes with a large liquid content, such as stews and soups, you place two-thirds of the coals beneath the oven and one-third on top. This transmits higher heat to the liquid. When baking, reverse these proportions: one-third beneath and two-thirds on top. Too many on the bottom may overcook the baking food. More coals on top give high heat to the baking air space in the oven and directly down to your food.
Charcoal briquettes can be used for heating as well. I usually place six or seven under a 12-inch oven and 12 to 15 on top, replenishing these with new briquettes when preparing dishes with long cooking times. If the ground is damp, place a piece of aluminum foil on it to protect your coals or briquettes and get maximum heating.
It’s sometimes tricky maintaining the proper heat while cooking. Regulate the heat by adding or taking away coals on top or beneath the oven, experimenting a bit if necessary. It’s a good idea to build a small fire beside the oven and keep shoveling the fresh-made coals from there to the oven. Check the progress of your cooking by lifting the lid with tongs or a hook and testing.
Remember, Dutch ovens are not just for baking. They work well for making soups and stews, pan frying, broiling and deep frying as well. The lid can be inverted and used as a griddle, with some rocks, or three metal tent pegs driven into the ground, as supports.
Dutch ovens are naturals for one-pot meals, but if you want to get spoiled, try the luxury of a whole battery of ovens: one for meat, one for vegetables, others for bread, pie, cake, cobbler, you name it. This is real living!
Here are some excellent recipes to try the next time you go camping.
Dutch Oven Brunswick Stew
Ingredients:
2 cups cooked, diced squirrel meat and/or chicken
3 quarts water
1/4 cup diced bacon
2 teaspoons fresh-ground black pepper
1/4 teaspoon cayenne pepper
1 tablespoon salt
1 cup pearl onions
2 cups peeled, whole tomatoes
2 cups diced potatoes
1 cup lima beans
2 cups whole-kernel corn
Directions:
Add all the ingredients to the Dutch oven, mix well, cover, add coals above and beneath, and simmer until everything is bubbly and heated through. Serve hot with thick wedges of fresh-made cornbread. Yield: 10 to 12 servings.
Melt-in-Your-Mouth Biscuits
Ingredients:
2 cups Bisquick baking mix
1 cup sour cream
1 stick (1/2 cup) melted margarine
Directions:
Preheat the Dutch oven. Mix all ingredients until smooth. Spoon dough into foil muffin cups, three-fourths full. Bake approximately 15 minutes.
Easy Dutch Oven Cobbler
Ingredients:
3/4 cup melted butter
1 cup sugar
1 cup flour
2/3 cup milk
1 large can sliced fruit
Directions:
Pour butter into the Dutch oven. Combine sugar, flour and milk. Pour over butter. Add fruit. Bake until golden brown.
Baked Apples
Ingredients:
Several apples
Sugar
Cinnamon
Butter
Directions:
Wash and core apples, preparing one or two per serving. Sprinkle sugar and cinnamon inside the hole, then add a pat of butter. Put apples in a greased pie pan and add a little water. Place the pan in a preheated Dutch oven, elevated to prevent burning. Cover, add coals on top and beneath, and bake for about 30 minutes.
Beanhole Beans
Ingredients:
1/2 pound sliced salt pork
8 cups cooked navy beans
4 tablespoons tomato paste
1 cup molasses
1/2 cup brown sugar
2-1/2 teaspoons dry mustard
1 teaspoon black pepper
1/2 teaspoon thyme
A pinch or two of ground cloves
2 quarts water
2 small onions, peeled
Directions:
Line the bottom of a Dutch oven with half the salt pork slices. Mix the remaining ingredients, except the onions and remaining salt pork, and pour into the pot. Bury the whole onions in the center of the beans. Arrange the remaining salt pork slices on top, cover the pot, and place in a hole slightly larger than the oven that you’ve dug beside the campfire. Rake hot coals and ashes over the top and sides. If your Dutch oven has a bail, leave it in an upright position for easier removal. Top the pot with aluminum foil to keep out the dirt, and shovel dirt back into the hole to a depth of 4 or 5 inches, tamping it down well. Now let the beans cook six to eight hours. When you return from a day’s hike or fishing expedition, you’ll have a special treat in store. Makes 12 to 15 servings.