I had nothing left to do but wring my hands. Hurricane Dorian was looming off the horizon. We were being bombarded by media telling us to hole up, hunker down and hang in. Stores, restaurants, schools and businesses across eastern and central Florida were closed. Mail didn't come for days.
I had done all I could to prepare, which felt as futile as those duck (under your desk) and cover (the back of your neck) drills we used to do in school to prepare for nuclear war. I'd set out candles, fed the flashlights fresh batteries, cleared off the patio, filled up water containers and prayed for the forgiveness of my sins, which took a while. All that was left was the fretting.
Like most of Florida, my husband and I were in wait mode. We numbly watched Dorian's cone of destruction move in slow-motion horror as it devoured the Northern Bahamas and threatened to wobble our way.
Just when I had eaten almost all of the hurricane snacks and was going to start on the rum, I literally stumbled across the perfect hurricane distraction. While in my garage, following a reporter's advice to practice manually opening my electric garage door in the dark in case the power goes out, I bumped into a roll of fabric leaning against the wall. For several months, this roll — two yards left from my barstool-cushion project — had been standing there mocking me.
"You're never going to get to this are you?" It said daily as I drove in. "Who are you kidding? You and your big home-decor plans."
"Just you wait!" I'd mentally answer. "I'll get to you someday."
Someday when I'm caught up at work and the groceries are bought and the laundry is done and the bills are paid and I've worked out and have no one to call back and nowhere to be and can't watch one more second of television, on that day I will turn this fabric into place mats for the table. I swore I would.
"Ha!" Cracked, the fabric. "What an idle threat."
And so the remnant stood there, taunting me from its cardboard roll, while I waited for that proverbial rainy day that never comes.
And then it did. Saving me from the last jar of trail mix.
For the record, I do not fancy myself a seamstress. Until last year, I did not — as a public service — own a sewing machine. I bought one, a $100 Singer, when my daughter moved into a ground-floor condo with front and back doors that were half glass windows. As her mother, I feel responsible for her modesty. Because the available ready-made curtains were worse than nothing, I sewed two linen rectangles.
Emboldened, I reasoned, if I can sew a rectangle, I can make a place mat. I had the fabric and had watched a YouTube tutorial, which is pretty much all you need anymore. I just needed that elusive rainy day.
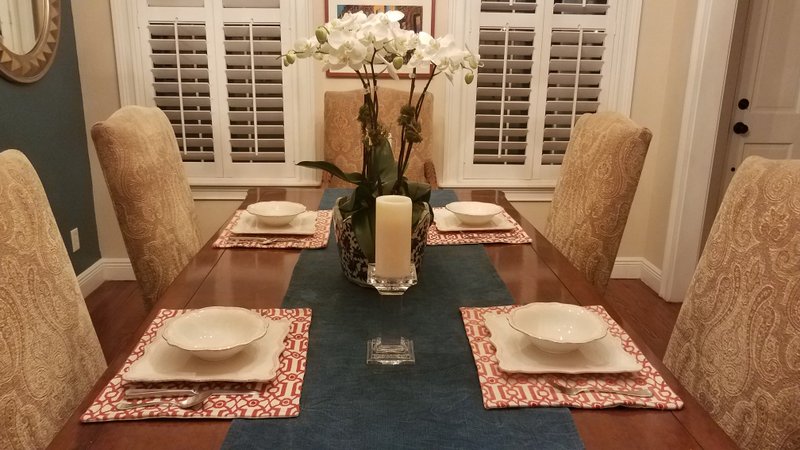
That day came. Fortunately, we stayed out of Dorian's awful way, and, thanks to my project, I stayed out of the liquor cabinet. And we have a nice new set of fall place mats. Besides saving money, making your own place mats lets you select a custom fabric that goes with your decor, which beats ready-made every time.
Here's how to make rainy-day place mats:
Pick your fabric. If you have fabric left from a drapery, pillow or upholstery job you've done, consider using it to make place mats or a table runner. Pick a backing fabric of either a coordinating print or solid. This gives you the option of making reversible place mats. I used plain ivory duck cloth as the underside because I wanted to feature only the main fabric. If your top and bottom fabrics are thin, add a layer of interfacing in between for structure.
Measure and cut. Standard place mats are 18-by-12 inches, but the beauty of custom mats is you can make them the size you want. I like a taller mat so glasses can fit easily above the flatware. Determine your finished size, then add a half-inch. I cut the main and backing fabrics into rectangles of 18 ½-by-14 ½-inches to allow for a ¼-inch seam all around.
Pin right sides together. Pair fronts to backs, and pin together, right sides touching. Mark a four-inch no-sew section on one edge of each pair. This opening should allow you to slip your fingers in to turn the place mat right side out after you've sewn it.
Sew edges, cut corners. Using a sewing machine, stitch a ¼-inch seam around the four sides, leaving the 4-inch section open. So you get a sharp corner, not a wad, trim the four corners at a diagonal, being careful not to cut the seam.
Reverse and press. Turn the fabric right side out, and press with a hot iron.
Top it off. To finish the mat, run a topstitch evenly around the edge of the place mat ¼ to ½ inch in from the edge. If the topstitch doesn't seal the open edge. Hand stitch it closed.
Trust me, if I can make these, you can, too.
Syndicated columnist Marni Jameson is the author of five home and lifestyle books, including Downsizing the Family Home — What to Save, What to Let Go
HomeStyle on 09/14/2019