The proposition sounds a little dubious: Leave some vegetables in a jar on your counter. Just leave them there. For weeks. Then eat them. It's perfectly safe, say the pickling enthusiasts. They're great for you. "You'll love them!" they say.
Not convinced? Science is here to explain why fermenting vegetables is not only perfectly safe but also surprisingly easy and rewarding. Spoiler: Microbes do most of the work.
In our hyper-Pasteurian, expiration date-driven era, it might be difficult to relinquish control over our food to these mysterious forces. But a small measure of understanding yields rich rewards: crisp classic sauerkraut, warmly tart beets, bright preserved lemons and just about anything else you can dream up.
These classically preserved foods and so many others — from kimchi to kombucha — have been expanding their footprint on cooler shelves in supermarkets and even on some restaurant menus. In part, we have to thank for this the proliferation of new research on gut health and the outsize role beneficial microbes (which are bountiful in fermented foods) play in helping our gut, immune system and overall health.
As the probiotic-driven food trend has accelerated, many chefs and consumers have also rediscovered a new world of flavor and texture that has long been missing from U.S. tables. We might have a sepia-style image of sauerkraut fermenting in large wooden barrels in Northeastern Europe. Or a vague notion of preserved lemons pepping up a warm Middle Eastern grain salad. But this style of food preparation can incorporate just about any produce you might find at the market -- or languishing in your crisper drawer -- and unexpected seasonings, such as spiced fermented beets.
Many of us grew up with shelf-stable pickles and krauts, which stay that way through a combination of vinegar and pasteurization. These two processes are ruthlessly effective in killing off harmful microbes. But they also zap the helpful ones.
Produce is naturally covered in microbes. For thousands of years, people have relied upon these unseen life-forms to create myriad delicious, nuanced non-vinegar ferments, often called "wild ferments."
The process is quite simple: Salt, submerge, wait. And eat.
Why does this method work so reliably? Salt kills harmful microbes and encourages beneficial ones, such as those that produce lactic acid, which are similar to many found in the gut microbiome. Similarly, submerging the produce in liquid (whether added or extracted from the food itself) protects it from the less-desirables.
And, the process offers further safety measures. As fermentation gets underway, the ascendant bacteria begin to alter the overall environment. They consume some of the carbohydrates from the produce, creating carbon dioxide (which appears as bubbles) and, more importantly for our purposes, lactic acid (which lowers the pH).
"The process is self-protecting," explains fermentation expert Sandor Katz, who is the author of The Art of Fermentation, among other books about the craft.
"Statistically, fermentation makes vegetables safer than they are raw," he says.
"It's pretty bomb-proof," agrees Mara King, co-founder of the fermented food company Ozuké. "As soon as you achieve something that is pretty sour, it is safe."
Food regulations deem fermented food safe at or below a pH of 4.6. For comparison, a lemon has a pH of 2 to 3. If you are skeptical about ballparking the sourness with a lemon-taste test, King suggests buying inexpensive paper pH test strips (remember those from high school chemistry class?) or investing in a pH meter.
As hands-off as the process seems, there are ways we can steer the bacteria to do their best work.
One method is through temperature. A warmer environment will encourage more bacteria to thrive more rapidly and will result in faster fermentation. A cooler environment will have the opposite effect (which is why we hold "finished" ferments in the fridge for longer-term keeping).
Generally, 65 to 70 degrees is an effective range for most vegetable ferments. We can also nudge the fermentation duration forward or backward with salt concentration — less salt for a faster ferment; more salt for a slower one.
Time is the final and most powerful variable. Over time, the flavor and texture of the produce shift toward the acidic and soft, respectively. Which is why Katz recommends "tasting at intervals."
Tasting also provides a reminder to keep tabs on ferments.
Although the microbes might be doing most of the work, it is important to ensure ferments remain submerged. An exposed piece of produce is inviting real estate for yeast and mold that need air to flourish.
But fear not if your ferments gain a bit of a surface growth — most frequently kahm yeast or a fuzzy mold. It's fine. Really.
"Remove it as best you can, and don't worry if some dissipates into your brine," Katz says. The salt and acidity will protect the rest of the ferment. (Watch for a bright, colorful mold. That could be hazardous. But in the decades of his work and travels, Katz has never seen a dangerous mold on fermenting vegetables.)
Despite what our 21st-century instincts might say, in the compendium of food preparation methods, lactic-acid fermentation is among the most forgiving. It's also healthful — and enthralling.
"I love the alchemical magic of the process," Katz says. And the science, too.
THE RECIPES
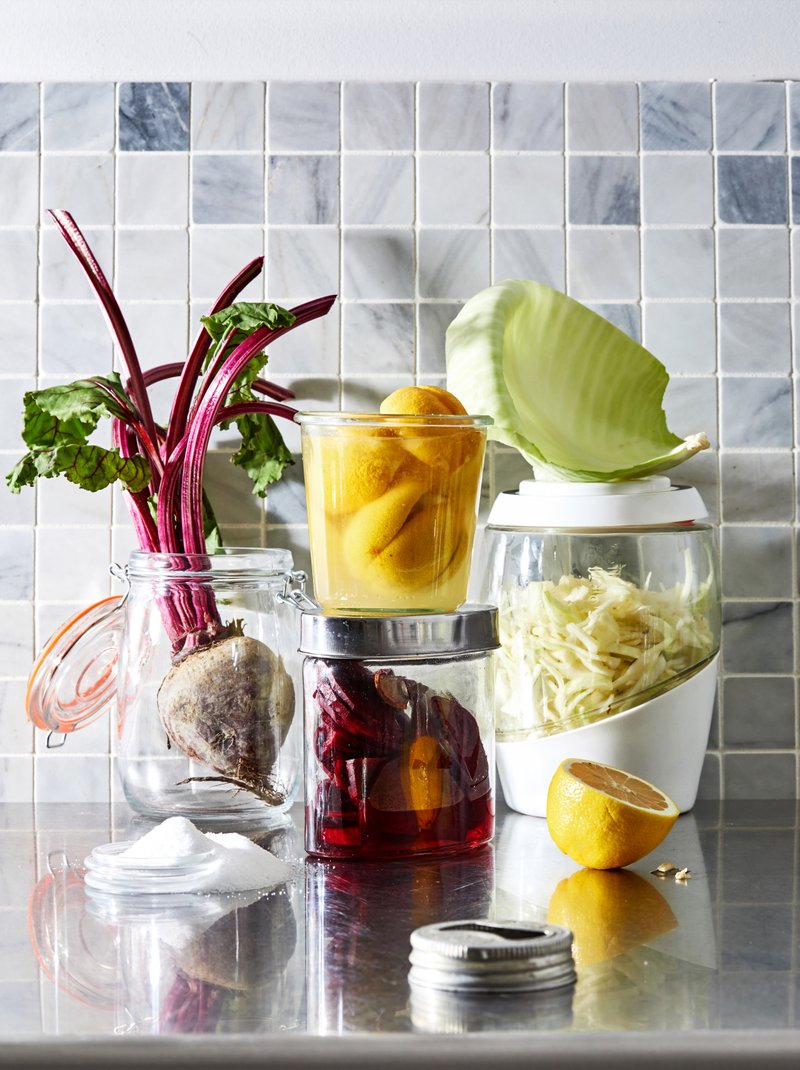
Versatile sauerkraut is easy to make and can stand as a condiment, snack or a side dish. Served as a hot dog topping, warmed alongside sausages or eaten out of a jar, this cabbage packs a delicious, fermented punch. While this recipe calls for caraway seeds, you can opt for other seasonings to flavor your kraut, such as dill or juniper berries.
Classic Sauerkraut
1 small head green cabbage (about 2 ½ pounds), wilted or damaged leaves discarded
1 tablespoon kosher salt, or more as needed
½ teaspoon caraway seeds
Using a chef's knife, cut the cabbage into quarters. Cut away the core from each quarter and discard. Place a cabbage quarter on the cutting board, flat-side down and slice across into ¼-inch strips. Repeat with the remaining wedges. Place the shredded cabbage in a large bowl and sprinkle with the salt.
Using your fingers, massage the cabbage forcefully for 5 to 10 minutes until it sheds enough liquid to submerge all pieces. Take a break every few minutes as needed; the salt will keep working while you rest. (If, after about 10 minutes you still don't have enough liquid to submerge the cabbage, mix 1 teaspoon of salt per 1 cup of water and add as needed.)
Add the caraway seeds and, using your hands, mix into the cabbage until combined.
Pack the cabbage into a clean 6-cup wide-mouth jar or crock.
Using a stone or water-filled plastic bag, weigh the cabbage down so it is submerged in the brine. Cover with a lid, cheesecloth or an airlock fermenting lid (which allows building gases to escape without allowing new air — and microbes — in). If using a plain lid, be sure to "burp" the jar regularly — ideally before you notice it bulging at all — to release gas. Or, you can cover with cheesecloth.
Place in a moderately cool location. A temperature range of 65 to 70 degrees will yield sauerkraut within 2 to 3 weeks.
Taste weekly to determine when the sauerkraut meets your preferred taste and texture. Some people prefer their kraut crunchy and light, while others enjoy a softer, more sour kraut that has been fermenting longer.
Store in a sealed jar in the refrigerator for up to 6 months. The sauerkraut will continue to slowly ferment over time. It will maintain its texture best when submerged in the brine.
Makes about 6 cups, about 24 servings.

Bright and briny, these preserved lemons make a flavorful addition to cooked grains, roasted chicken, stew or soups. You can also muddle or puree some of the lemon to add brightness to a gin-and-tonic or a martini.
Preserved Lemons
5 small, organic and preferably unwaxed lemons (about 1 pound)
5 teaspoons kosher salt, divided, or more as needed
Make a deep "x" incision in 4 of the lemons, leaving about ¼-inch intact at the bottom of each fruit, so it almost opens like a flower. Pack about 1 teaspoon salt into each lemon, getting it between the sections.
Pack the salted lemons into a wide-mouth jar just large enough to hold the lemons, squishing them down with clean hands to yield as much liquid as possible. Juice the remaining lemon; you will need about ¼ cup of juice. Dissolve 1 teaspoon of salt in 1 cup of water; then add the juice. Pour the brine over the lemons until they are completely submerged, then weigh the lemons down with a heavy stone or water-filled plastic bag. (If you don't have enough liquid to cover the lemons in the jar, you can mix 1 teaspoon of salt per 1 cup of water, and add as needed.)
Cover and place in a moderately cool location, about 65 to 70 degrees. (If using a lid, be sure to "burp" the jar regularly — preferably before it shows signs of bulging. Or use cheesecloth or an airlock fermenting lid, which will allow microbe-created gas to escape while keeping outside air from entering. If using cheesecloth, you do not need to cover with a lid.)
Taste the lemons after 3 weeks, and weekly thereafter, to determine readiness. They will remain a saturated yellow and will taste bright, salty and sour — including the peel.
Makes 4 lemons, about 8 servings.

These striking, ruby-red beets retain their beautiful hue and add crunch and flavor to whatever you are eating. Try tossing them into a winter salad of endive, sliced apples and chopped almonds.
Spiced Fermented Beets
1 pound beets, trimmed and scrubbed
1 ½ teaspoons kosher salt, or more as needed
1 cup water, or more as needed
1 cinnamon stick (or other equivalent seasoning, such as cardamom seeds)
Extra-virgin olive oil, for serving
Freshly cracked black pepper, for serving
Slice the beets into ¼-inch-thick rounds. If the beets are wider than the jar, cut the slices into half-moons.
Dissolve the salt into water at a ratio of 1 ½ teaspoons salt to 1 cup water.
Pack a wide-mouth jar with half of the beet slices. Add the cinnamon stick, followed by the remaining beet slices to the jar. Pour the saltwater over the beets until fully covered. If you don't have enough liquid to cover the beets in the jar, dissolve 1 ½ teaspoons of salt in 1 cup of water, and add as needed. If any of the beets are floating, weigh them down with a heavy stone or water-filled plastic bag.
Cover and place in a moderately cool location, about 65 to 70 degrees for about 2 weeks. If using a lid, be sure to "burp" the jar regularly — ideally before it shows any signs of bulging. Due to the high sugar content of beets, they ferment quickly and can cause a mess if excess pressure builds up in the jar. Or, use cheesecloth or an airlock fermenting lid, which allows carbon dioxide from the microbes to escape but does not allow outside air to enter. If using cheesecloth, you do not need to cover with a lid.
After 2 weeks, taste the beets weekly to determine readiness — a shorter ferment will yield earthy, crunchy beets, whereas more time will make them softer and more warmly spiced. Red beets will retain much of their vibrant color.
Serve drizzled with mild olive oil and a twist of fresh-cracked black pepper.
Makes about 4 cups, about 8 servings.
All recipes by Katherine Harmon Courage, who is the author of Cultured: How Ancient Foods Can Feed Our Microbiome (Avery/Penguin Random House).
Food on 01/22/2020