Help Mom manage her to-do list with a handy organizer

This make-at-home clipboard has a place for everything. (Photo for The Washington Post by Kris Coronado)

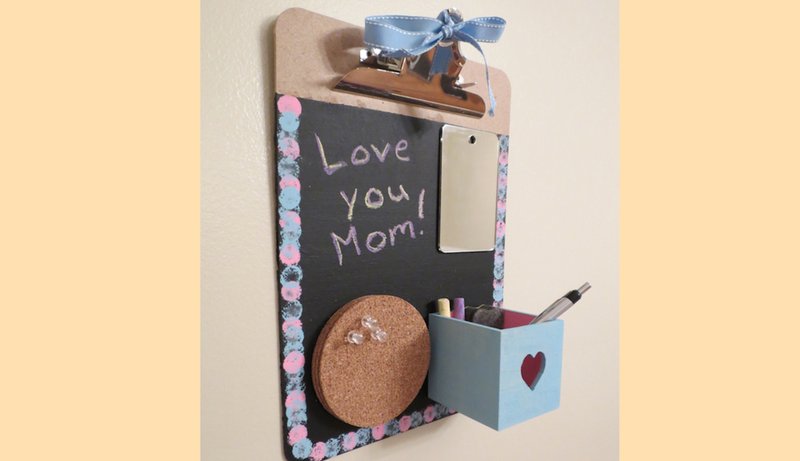
One thing all moms have in common? They're busy. Create this custom clipboard as a Mother's Day gift to help Mom manage her ever-changing to-do list.

A chalkboard is for jotting down quick reminders. A mirror for those "anything in my teeth?'" checks. A small box can hold chalk and pens. And the corkboard is for sticky notes, a memo pad or a snapshot of the crafty person who made this terrific gift.

Hands-on time: 30 minutes

Overall time: 1 ½ days

Adult's help: Yes. This project uses Gorilla Glue, a very strong glue that can be harmful if not handled properly. Have an adult help with all gluing tasks. Gorilla Glue also expands as it dries, so apply it at least an inch away from the edge of all materials being glued on.

SUPPLIES

The supplies you will need. (Photo for The Washington Post by Kris Coronado)

standard clipboard

blue tape

newspaper sheet

chalkboard paint with a paint mixing stick

1-inch-wide paintbrush

small wooden craft box

two colors of acrylic paint

paper plate

½-inch-wide round sponge brush (found at craft stores)

small mirror (found at craft stores)

Gorilla Glue

four 4-inch-wide cork discs (found at craft stores)

18-inch-long ribbon

thumbtacks

chalk

pen

small eraser

OPTIONAL SUPPLIES

self-stick notes

small memo pad

HOW TO DO IT

1. Unroll blue tape across the clipboard clip, horizontally, making sure to cover the clip bottom completely. Place clipboard on the newspaper sheet.

1. Unroll blue tape across the clipboard clip, horizontally, making sure to cover the clip bottom completely. Place clipboard on the newspaper sheet. (Photo for The Washington Post by Kris Coronado)

2. Open the chalkboard paint and mix according to paint instructions. Paint the clipboard below the tape, moving in the same direction to create a smooth surface. (You can apply a second paint coat, if you like.) Wash the paintbrush in a sink. After 10 minutes, gently re-position the clipboard on the newspaper to avoid any sticking. Let it dry for 24 hours.

2. Open the chalkboard paint and mix according to paint instructions. Paint the clipboard below the tape, moving in the same direction to create a smooth surface. (You can apply a second paint coat, if you like.) Wash the paintbrush in a sink. After 10 minutes, gently reposition the clipboard on the newspaper to avoid any sticking. Let it dry for 24 hours. (Photo for The Washington Post by Kris Coronado)

3. As the clipboard dries, squirt a quarter-size amount of one acrylic paint color on the paper plate. Use this color to paint the inside of the wooden box, using more paint as needed. When the inside is finished, rinse the paintbrush and paint the outside with the second color. Place the box on the newspaper to dry for five minutes.

3. As the clipboard dries, squirt a quarter-size amount of one acrylic paint color on the paper plate. Use this color to paint the inside of the wooden box, using more paint as needed. When the inside is finished, rinse the paintbrush and paint the outside with the second color. Place the box on the newspaper to dry for five minutes. (Photo for The Washington Post by Kris Coronado)

4. When the chalkboard is dry, peel off the blue tape. Squeeze more paint onto the paper plate, as before, then dab the round sponge brush into a color. Stamp the sides and bottom of the chalkboard. Rinse the sponge in water, then squeeze, before changing colors. Let dry for five minutes.

4. When the chalkboard is dry, peel off the blue tape. Squeeze more paint onto the paper plate, as before, then dab the round sponge brush into a color. Stamp the sides and bottom of the chalkboard. Rinse the sponge in water, then squeeze, before changing colors. Let dry for five minutes. (Photo for The Washington Post by Kris Coronado)

5. Keep the clipboard flat and glue the mirror to the top right of the chalkboard. (The glue doesn't dry right away, so don't tilt the clipboard!) Glue the painted box to the bottom right with the opening facing the top of the clipboard.

5. Keep the clipboard flat and glue the mirror to the top right of the chalkboard. (The glue doesnմ dry right away, so donմ tilt the clipboard!) Glue the painted box to the bottom right with the opening facing the top of the clipboard. (Photo for The Washington Post by Kris Coronado)

6. Glue the cork discs, one on top of the other, on the bottom left of the chalkboard. Let all glued items dry flat for two hours.

6. Glue the cork discs, one on top of the other, on the bottom left of the chalkboard. Let all glued items dry flat for two hours. (Photo for The Washington Post by Kris Coronado)

7. Use the ribbon to tie a bow through the clipboard clamp hole.

7. Use the ribbon to tie a bow through the clipboard clamp hole. (Photo for The Washington Post by Kris Coronado)

8. Fill the wooden box with a mini eraser, chalk, pen and paper. Stick a few thumbtacks in the corkboard. Write Mom a sweet message with chalk and hide your gift until Sunday, Mother's Day.

ADG Families on 05/05/2020

Upcoming Events