As spring blossoms, some anglers and boaters will pay the price of neglecting their boats and trailers over the winter.
Wheel bearings will fail. Motors won't start, or they'll quit.
It doesn't have to be so dire. With a little preventive maintenance today, you can avert disappointment on the road and on the water tomorrow, as well as the hefty repair bills that ensue.
TRAILER MAINTENANCE
It's always such a sad sight to see a disabled boat trailer trailer on the side of the road. It's usually missing a wheel which was flung off the hub when its rusty bearing seized up and snapped.
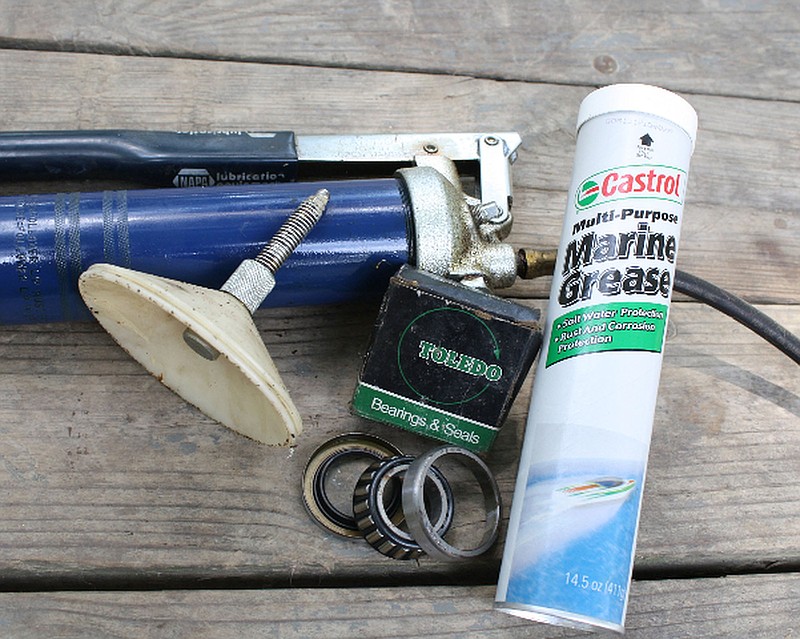
The remedy is easy and inexpensive. If you're a do-it-yourselfer, you can repack and reinstall wheel bearings in a few hours or less.
First, put on thick latex gloves. This will make the job a lot tidier.
Next, remove the tires and pry the grease caps from the hubs. This might actually be the most time consuming part of the process. You'll have to slip the tip of a screwdriver between the hub and the grease cap lip. It's best done by tapping the end of the screwdriver with a rubber mallet. When you finally get a slight amount of headway, turn the screwdriver side to side to work the cap upward. Then, work your way around the cap repeatedly until it rises high enough to pull free.
That will expose the castellated nut, which is held in place by a cotter pin that goes through a hole in the spindle. Straighten the cotter pin and remove it with pliers. The cotter pin is usually twisted and warped, so this will take some effort, as well.
Remove the castellated nut, and then remove the thrust washer beneath. The wheel bearing assembly is now exposed.
Rock the hub side to side while steadily pulling. When it breaks free, pull it out slightly and then push it back. This will expose the outer wheel bearing. Remove it and spin the bearing in your hand. It should spin freely and smoothly. If so, you need only to repack it with fresh wheel bearing grease. Don't skimp. Use high-quality, marine grade grease.
You can pack bearings by hand, but let's not. We've done plenty of them this way, and it's not an efficient use of time. Spend $10 or so for a proper wheel bearing packer at your local auto parts store. It contains two plastic cones held together with a nut and a grease fitting. Place the bearing on the bottom cone, bolt the top cone atop the bearing. Attach a grease gun to the fitting and pump the bearing full of fresh grease.
Do the same thing to the inner bearing. To remove it, pry the dust seal from its housing on the inner hub channel. This will ruin the dust seal, so you must purchase a new one even if you don't purchase new bearings. With the dust seal removed, pull out the inner bearing with your fingers.
If you feel a gritty sensation when spinning bearings, it means dirt is in the rollers. Spray the bearings with brake cleaner to remove impurities, as well as all of the old grease. I do this as a matter of routine because I don't like mixing old grease and new. Spin the bearings without grease. They should rotate smoothly.
New wheel bearings come with a new bearing race. It's a smooth metal band that goes inside your hub to provide a spinning surface for the bearing. Removing a race from a hub is a major hassle. If the existing race isn't worn or pitted, leave it. It's fine.
Pack the rear hub interior with grease. Seat the interior bearing against the race. Gently place the dust seal over the interior hub channel. Place a block of wood atop the dust seal and gently seat it by tapping it with a mallet. It must go in evenly. If it bends, it is ruined.
Seat the outer bearing inside the outboard hub channel. With your thumbs holding the wheel bearing in place, guide the hub onto the spindle. Install the thrust washer and seat it with the castellated nut.
I recommend tightening the castellated nut with a torque wrench and following torque specifications. If you don't have a torque wrench, tighten the lock nut so that the hub spins with resistance. Gradually loosen the castellated nut to relieve pressure on the hub and continue to do so until the hub spins freely. Install the cotter pin through a slot in the castellated nut through the hole in the spindle, and then bend the cotter pin arms downward.
Replace the grease cap. Repeat the process with the second wheel.
To clean the gunk and goo from your hands, I have two words: Fast Orange.
FUEL AND SPARK
Most engine failures are due to a breakdown in the fuel system. You can avoid these by regularly changing your fuel filter and by cleaning your fuel hose fitting. Gunk and dirt collects on the fitting. Inevitably, some of that will enter the fuel system and clog a carburetor jet.
If you haven't used your boat in a few months, discard old fuel from your tank and start anew with fresh, ethanol-free fuel. A good additive will stabilize your fuel. I use StarTron, Lucas and SeaFoam.
Some boaters change their plugs every year whether they need it or not. I do not, but I do carry a spare set in my boat.
Finally, make sure your batteries are charged before you leave the house. It will ruin your day to launch a boat that won't start because the batteries are dead.
Charging them constantly with an inexpensive trickle charger will ensure that this doesn't happen.
Trailer lighting is the bane of all boat owners, but we'll cover that in a separate article.