When duck season ended Tuesday, most hunters put away their shotguns until November.
If you don't properly clean and condition them for storage, you might have made a costly mistake.
Avid duck hunters fire scores of shots in wet, grimy conditions. Duck hunting mostly takes place in or around water, and always around mud and sand. You cannot keep moisture and grit out of a shotgun. Wiping down the exterior with an oily rag and running a Bore Snake down the barrel will remove superficial fouling, but if you stop there, corrosion will at best require the services of a gunsmith. At worst, they will require you to buy a new gun.
Choke tubes
A shotgun's simplest and most accessible component is also the most neglected, and the one that causes the most misery. The choke tube, the metal cylinder that screws into the end of your bore and determines how your shotgun patterns your load. Many duck hunters use one tube, and they never take it out. If you don't remove the tube and clean its threads, and also the threads in your bore, the tube will eventually rust weld into the bore. Removing it will require surgery.
A friend discovered that the hard way with his Benelli M-90 12-gauge. A gunsmith in the Little Rock area couldn't remove it, so he sent it to Briley, a noted chokesmith. Briley charged $100 to ream out the seized choke. Shipping cost $15 each way for a total cost of $130 for a gun that was only worth about $900.
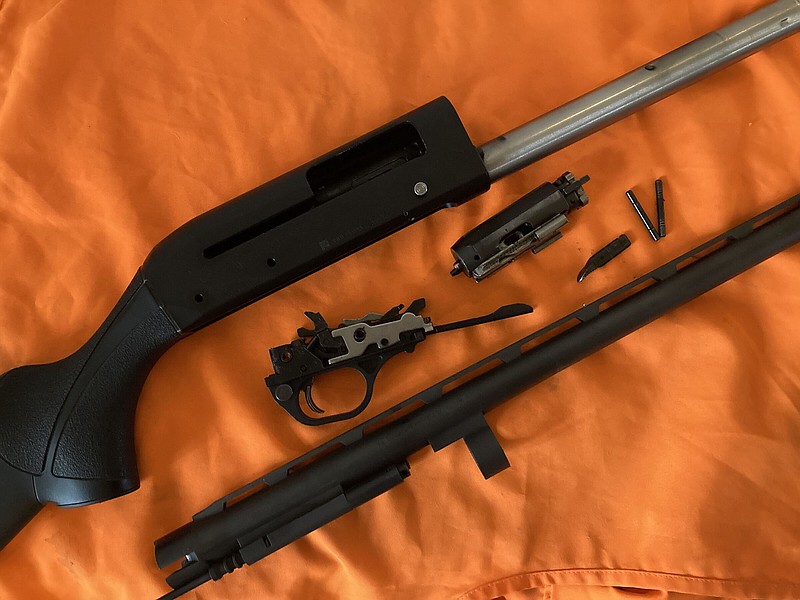
My Remington V3 was near to the same fate. The tube I used all season wouldn't budge. Fortunately it was an extended tube. I wrapped a rag around it, clamped vise-grips to it as lightly as possible and broke it loose. The tube threads and the first three inches of the bore were coated in fine, brown rust.
First, I scrubbed the tube with a nylon bristle brush soaked with gun oil. I wiped it down and repeated the process multiple times until it was clean. I repeated the process in the bore. The brush, which you can get in a kit from almost any auto supply store or from Harbor Freight, is the right size to spin around inside a 12-gauge bore. After each round of scrubbing, I worked a gun cleaning patch around the bore and threads with a finger and lifted embedded grime from the threads with a Q-Tip. I pulled a snake down the barrel and repeated the process until it was clean.
Regrettably, some rust acne had formed in the bore above the threads. I removed them by scrubbing with 000 steel wool. A thorough steel wool treatment left the bore shiny and smooth.
I applied a dab of choke tube grease to the lower three threads on the tube and screwed it back in.
Bolt
Late in the season I fell in the water while hunting in flooded timber and submerged my gun. Removing the moisture and grit from immersion in muddy water required fully breaking down the gun, starting with the bolt.
First, make triple sure there is not a shell in the gun. Inspect the chamber and magazine. Cycle the action and inspect the chamber again and then again.
Unscrew the forearm cap and remove the forearm. Then, pull back the bolt slightly to free the barrel. Remove the barrel.
The disassembly process for an autoloader is different than that for a pump gun. We'll cover pump guns in a separate article.
To disassemble an autoloader, remove the bolt handle. The bolt handle on many guns pulls straight out. Removing the bolt handle on the Remington V3 is a bit of a process. Don't lose the bolt handle.
Slide the bolt assembly out of the chamber. Wipe down the bolt with a solvent-soaked patch, especially the surfaces that contact the action rails in the chamber. These surfaces must be slick and spotless for the bolt to travel freely. Remove the solvent by hand with a clean patch.
Scrub all of the contact surfaces, and also the firing pin area, with an oiled brush and then lightly spray the entire bolt with a light gun oil, like Rem Oil. Do not use WD-40.
Wear latex gloves when handling gun solvents and oils.
Trigger Assembly
This is your gun's control center. It contains the hammer and cocking mechanism, with all of the little springs and other little parts that must be clean and lubricated for the thing to work.
Removing the trigger group is easy. Two small drift pins hold the trigger group to the receiver. Lightly tap the pins out with a small punch or a small screwdriver. Don't lose them.
With the pins out, gently lower the trigger assembly from the receiver. Spray the assembly with Gun Scrubber Firearms Cleaner. Brush the assembly with a nylon brush to loosen carbon buildup and other contaminants and then wipe everything clean with a dry patch. I use cotton patches because they are supple and pliable, allowing you to weave it in and out of crevices and recesses. Clean tight spots with Q-Tips.
When all buildup is removed, add a drop of Rem Oil to every spring and pivot point.
Receiver
Before reassembly, scrub the inside of the receiver with solvent-soaked patches. Use a brush to lift stubborn fouling. Remove all fouling by hand with clean patches.
Brush oil onto the contact rails.
Recoil spring
Traditional gas-operated autoloading shotguns have a long recoil spring in the stock that re-cocks the trigger. To service the spring, you must remove the buttstock. Find and remove the two screws that hold the recoil pad to the stock. This will expose the nut and bolt that hold the stock to receiver. Remove the stock to expose the recoil spring, but do not remove the spring unless the spring needs to be replaced.
Scrub the spring with solvent and brush off fouling. Remove it with a patch and coat the spring with light oil.
Replace the stock and recoil pad.
Reassembly
Lift the trigger assembly back into the receiver and reinstall the drift pins.
Replace the bolt. Traditional gas guns have a long rod on the back of the bolt with a ball that rests inside a cup on the recoil spring plunger. Make sure the rod is secure against the plunger.
Guns like the Remington V3 and Benelli guns with an Argo system don't have recoil springs and plungers. They have guide rods and springs that connect with the gas regulation tubes that hang from the barrel. The flanged rod base goes into the receiver.
Reinstall the bolt handle.
Reinstall the barrel.
Reinstall the forearm.
Reinstall the forearm cap.
Do a basic function check to make sure the bolt moves freely and locks on an empty chamber. Point the muzzle in a safe direction and try the trigger.
Store the gun in a dry, ventilated area. It will be ready for use in the fall.